Lemon Rice

Lemon Rice

Delicious and Tangy: Exploring the Magic of Lemon Rice

Lemon rice, a easy but flavorful dish, holds a unique region in the hearts of many across the globe. Originating from South India, this dish has transcended boundaries and found its way into kitchens global, fascinating flavor buds with its precise combo of tanginess and aromatic spices. Join me on a culinary journey as we delve into the magic of lemon rice.

A Burst of Flavor

At first look, lemon rice may appear to be a humble dish, however don’t allow its simplicity idiot you. Each chunk is a burst of taste that awakens the senses. The tanginess of sparkling lemon juice perfectly enhances the earthiness of rice, creating a symphony of flavor this is both clean and satisfying.

A South Indian Tradition

In South India, lemon rice isn’t just a dish; it’s a culture. Often served as a part of a festive meal or provided as prasadam in temples, it holds cultural importance beyond its culinary attraction. The vibrant yellow hue of turmeric-infused rice symbolizes prosperity and auspiciousness, making it a staple in celebratory activities.

A Culinary Adventure

What makes lemon rice truly special is its versatility. While the fundamental recipe requires rice, lemon juice, and a tempering of mustard seeds, curry leaves, and inexperienced chilies, there may be sufficient room for experimentation. Additions like peanuts, cashews, or grated coconut can beautify the texture and taste profile, even as spices like cumin and coriander can elevate the dish to new heights.

A Comforting Companion

Lemon rice is not just a dish; it’s a comforting companion on a rainy day or a busy weeknight. Its simplicity makes it a cross-to alternative for the ones in search of a short and enjoyable meal with out compromising on taste. Whether served warm or cold, it in no way fails to evoke feelings of heat and contentment.

A Global Favorite

Thanks to its delicious flavor and ease of preparation, lemon rice has won popularity beyond South India. From food stalls in bustling road markets to satisfactory-eating eating places, it has found its way onto menus global, delighting diners with its vibrant flavors and healthy goodness.

Lemon Rice

RECIPE

Curious to attempt your hand at making lemon rice? Here’s a simple recipe to get you started out:

Ingredients:
– 1 cup rice
– 2 tablespoons lemon juice
– 1 teaspoon mustard seeds
– A handful of curry leaves
– 2-3 inexperienced chilies, slit lengthwise
– half of teaspoon turmeric powder
– Salt to taste
– 2 tablespoons oil
– Optional: roasted peanuts, cashews, grated coconut

Instructions:
1. Cook the rice until fluffy and set aside to cool.
2. Heat oil in a pan and add mustard seeds. Once they begin to splutter, add curry leaves and inexperienced chilies.
3. Add turmeric powder and sauté for a few seconds.
Four. Add the cooked rice to the pan and blend properly, making sure that the turmeric is lightly dispensed.
5. Add lemon juice and salt to taste. Mix gently to avoid breaking the rice grains.
6. Optional: Garnish with roasted peanuts, cashews, or grated coconut for introduced flavor and texture.
7. Serve hot or bloodless, as preferred.

https://spicesaroma.com/sabudana-vada/

Tangy Twist: Lemon Rice Recipe with Tamarind Juice

Lemon rice, a loved South Indian dish, receives a tangy makeover with the addition of tamarind juice. This flavorful variation adds a zesty punch to the conventional recipe, raising it to new heights of deliciousness. Join me as we explore how to create this tantalizing lemon rice with tamarind juice.

Ingredients:

1 cup rice
2 tablespoons tamarind juice (extracted from tamarind pulp)
2 tablespoons lemon juice
1 teaspoon mustard seeds
A handful of curry leaves
2-3 inexperienced chilies, slit lengthwise
half teaspoon turmeric powder
Salt to flavor
2 tablespoons oil
Optional: roasted peanuts, cashews, grated coconut

Instructions:

Cook the rice till fluffy and set apart to cool.

In a small bowl, soak tamarind pulp in warm water for 10-15 mins. Extract the juice and discard the pulp.

Heat oil in a pan and add mustard seeds. Once they start to splutter, upload curry leaves and green chilies.

Add turmeric powder and sauté for a few seconds.

Pour in the tamarind juice and let it simmer for a couple of minutes until the raw scent disappears.

Add the cooked rice to the pan and blend well, ensuring that the tamarind mixture coats the rice evenly.

Add lemon juice and salt to flavor. Mix lightly to keep away from breaking the rice grains.

Optional: Garnish with roasted peanuts, cashews, or grated coconut for delivered flavor and texture.

Serve warm or cold, as preferred.

Enjoy the Tangy Delight:

This lemon rice with tamarind juice gives a pleasing combo of tanginess and spices in an effort to tantalize your flavor buds. The tangy tamarind flavor flawlessly enhances the citrusy notes of lemon, growing a symphony of flavors this is both clean and pleasant. Whether served as a side dish or a chief path, this dish is positive to be successful at your next meal.

https://amzn.to/48HyMVm

In Conclusion

Lemon rice with tamarind juice is a delicious twist at the traditional South Indian dish, imparting a burst of flavors in an effort to depart you yearning more. With its easy yet vibrant elements, it’s easy to see why this dish has grow to be a favorite in households around the sector. Lemon rice is more than only a dish; it is a culinary masterpiece that brings pleasure to countless human beings round the world. With its vibrant flavors, comforting aroma, and cultural significance, it keeps to enchant and encourage food fans everywhere. So why now not embark in your very own culinary adventure and revel in the magic of lemon rice today?

Lemon Rice

Sabudana Vada:

Savoring Sabudana Vada: A Culinary and Nutritional Delight

sabudana vada

Sabudana Vada, a liked Indian snack, holds a loved vicinity within the hearts and palates of millions. With its crispy outside and smooth, flavorful indoors, this dish encapsulates the essence of Indian consolation meals. But there is extra to Sabudana Vada than simply its delicious taste; it brings with it a number of health advantages that make it a satisfying addition to any diet.

Introduction to Sabudana:

Sabudana, additionally referred to as tapioca pearls or sago, is a starchy substance extracted from the roots of the cassava plant. In Indian delicacies, it’s far a popular factor used for the duration of religious fasting intervals due to its excessive energy content. Sabudana pearls are versatile and may be used in numerous dishes, starting from savory snacks like Sabudana Vada to candy treats like Sabudana Kheer.

Health Benefits of Sabudana Vada:

Rich Source of Carbohydrates: Sabudana is predominantly made up of carbohydrates, making it an exquisite source of strength. Consuming Sabudana Vada can offer a quick energy enhance, making it ideal for breakfast or as a mid-day snack.

Gluten-Free: For individuals with gluten intolerance or Celiac disorder, Sabudana Vada serves as a brilliant alternative to traditional wheat-based snacks. Its gluten-free nature ensures that it may be loved by a much wider variety of humans without adverse reactions.

Easy to Digest: Sabudana is easy on the digestive machine, making it appropriate for people with touchy stomachs or the ones convalescing from infection. The gentle texture of Sabudana Vada in addition complements its digestibility, making it a gentle alternative for those with dietary regulations.

Nutrient-Rich: While Sabudana frequently affords carbohydrates, it also includes important vitamins and minerals which include calcium, iron, and phosphorus. These vitamins make a contribution to general fitness and well-being, assisting various bodily capabilities.

Potential Weight Loss Benefits: Due to its low fat content and excessive satiety element, Sabudana Vada can be included into weight loss diets. When ate up moderately as a part of a balanced meal plan, it can assist manipulate starvation cravings and prevent overeating.

How to Make Sabudana Vada:

Soak Sabudana pearls in water for a few hours until they come to be tender and plump.
Drain extra water from the soaked Sabudana and blend it with mashed potatoes, chopped green chilies, peanuts, coriander leaves, and spices like cumin and salt.
Form the aggregate into small patties and shallow fry them until golden brown and crispy on the out of doors.
Serve warm with mint chutney or yogurt for a pleasing culinary experience.

Religious Significance:

Sabudana’s cultural importance is most prominently located in the course of non secular festivals and fasting periods in India. It is a staple ingredient in dishes organized for Navratri, a 9-night time Hindu festival devoted to the worship of the goddess Durga. Devotees often look at fasts during Navratri, abstaining from ingesting grains and positive veggies. Sabudana, being gluten-unfastened and without difficulty digestible, will become a desired element at some stage in these fasting periods.

Sabudana Khichdi (a savory dish made with soaked Sabudana, potatoes, peanuts, and spices) and Sabudana Vada (crispy fritters made with Sabudana, potatoes, and spices) are generally enjoyed at some point of Navratri fasting rituals, symbolizing sustenance and non secular devotion.

Regional Variations:

The recognition of Sabudana transcends nearby boundaries, with versions of dishes offering this versatile ingredient observed across India. In Maharashtra, Sabudana Vada is a loved snack loved with the aid of human beings of all ages. Crispy at the outdoor and tender on the internal, those deep-fried fritters are often served with spicy green chutney, adding a burst of flavor to every bite.

In Karnataka, Sabudana Khichdi is prepared with a South Indian twist, incorporating substances like curry leaves, mustard seeds, and grated coconut for a completely unique flavor profile. Similarly, in Gujarat, Sabudana Khichdi is often paired with yogurt or buttermilk, providing a fresh assessment to its savory taste.

Celebratory Occasions:

Beyond religious fairs, Sabudana dishes are also loved at some stage in celebratory activities which include weddings, birthdays, and family gatherings. Whether served as an appetizer, snack, or predominant direction, Sabudana-based totally dishes upload a hint of way of life and indulgence to special activities. Families come collectively to put together these cuisine, sharing no longer best scrumptious food but also loved recollections and laughter.

Modern Adaptations:

In current years, Sabudana has received recognition beyond its traditional utilization, locating its manner into cutting-edge, fusion recipes and global cuisines. From Sabudana pancakes to Sabudana pudding, culinary enthusiasts have embraced this versatile component, experimenting with new taste mixtures and presentations. Health-aware individuals additionally respect Sabudana for its gluten-loose and vegan-friendly homes, incorporating it into their diets as a nutritious alternative to processed grains.

.https://spicesaroma.com/chicken-nuggets/

STEP BY STEP RECIPE OF SABUDANA VADA

Sabudana Vada is a delightful Indian snack, best for pleasurable cravings with its crispy outside and smooth, flavorful interior. Here’s a step-by-step manual to developing those mouthwatering fritters inside the comfort of your very own kitchen:

Ingredients:

1 cup Sabudana (tapioca pearls)
2 medium-sized potatoes, boiled and mashed
half of cup roasted peanuts, overwhelmed
2-3 inexperienced chilies, finely chopped
2 tablespoons chopped clean coriander leaves
1 teaspoon cumin seeds
Salt to flavor
Oil for frying

Step 1: Prepare the Sabudana

Rinse the Sabudana pearls beneath cold water till the water runs clean to eliminate excess starch.
Place the Sabudana in a bowl and cover it with water, making sure that the water level is ready 1 inch above the Sabudana.
Allow the Sabudana to soak for at the least four-6 hours or overnight till it becomes tender and plump.

sabudana vada
Step 2: Boil and Mash the Potatoes

Peel the potatoes and boil them until they’re fork-smooth.
Once boiled, drain the water and permit the potatoes to cool slightly.
Mash the potatoes the use of a fork or potato masher till smooth and lump-unfastened. Set apart.

sabudana vada
Step 3: Prepare the Filling

In a blending bowl, combine the soaked Sabudana, mashed potatoes, beaten peanuts, chopped inexperienced chilies, chopped coriander leaves, cumin seeds, and salt to taste.
Use your hands to mix all of the ingredients together thoroughly, making sure that the combination is well-combined and cohesive.

sabudana vada
Step 4: Shape the Vadas

Take a small part of the aggregate in your arms and form it right into a easy, spherical ball.
Flatten the ball slightly to shape a disc-shaped patty. Repeat this method with the last aggregate till all the vadas are formed.

Step 5: Fry the Vadas

Heat oil in a deep frying pan or kadhai over medium warmness.
Once the oil is warm, carefully slide the formed vadas into the oil, making sure not to overcrowd the pan.
Fry the vadas in batches, turning them on occasion, till they’re golden brown and crispy on all aspects.
Using a slotted spoon, remove the fried vadas from the oil and switch them to a plate coated with paper towels to take in excess oil.

Step 6: Serve and Enjoy

Serve the new and crispy Sabudana Vadas with mint chutney, tamarind chutney, or yogurt for dipping.
Garnish with extra chopped coriander leaves for a sparkling burst of taste.
Enjoy the Sabudana Vadas as a snack, appetizer, or accompaniment for your favorite Indian meal.

sabudana vada
Tips:

Ensure that the Sabudana is soaked properly to reap the favored smooth texture in the vadas.
Adjust the quantity of inexperienced chilies in keeping with your spice choice.
For a more healthy opportunity, you may shallow fry the vadas rather than deep-frying them.
With these simple steps, you could recreate the impossible to resist flavors of Sabudana Vada at domestic and deal with your self to a delicious snack that is certain to impress!

https://amzn.to/3SOE3Vf

In Conclusion:

Sabudana Vada now not best tantalizes the taste buds however additionally gives a plethora of fitness advantages. Whether enjoyed as a snack, appetizer, or a part of a meal, this beloved Indian dish has earned its vicinity as a dietary powerhouse.

So, the subsequent time you crave a flavorful and enjoyable deal with, keep in mind indulging inside the goodness of Sabudana Vada. Your taste buds and your frame will thank you for it!

In the wealthy tapestry of Indian cuisine, certain dishes stand out now not best for his or her tantalizing flavors however also for their deep-rooted cultural importance. Sabudana, normally referred to as tapioca pearls or sago, holds a unique location in Indian culinary traditions, respected for its versatility, nutritional cost, and affiliation with religious practices

The cultural reputation of Sabudana transcends generations, regions, and nutritional choices, reflecting the rich diversity of Indian delicacies. Whether enjoyed as a part of spiritual rituals, festive celebrations, or ordinary food, Sabudana symbolizes culture, nourishment, and culinary creativity.

Its enduring attraction lies not simplest in its delicious taste but additionally in its capacity to convey human beings together, fostering a sense of network and cultural delight. As India continues to adapt, Sabudana remains a timeless element, loved for its cultural significance and culinary versatility.


Chicken Nuggets

chicken nuggets

Title: The Golden Story of Chicken Nuggets: A Deep Dive into History, Nutrition, and Cultural Popularity

Introduction:
Welcome to the crispy, golden global of chook nuggets! These bite-sized wonders have become a staple inside the global of rapid meals and domestic kitchens alike. In this blog, we’ll take a adventure thru the charming history of chook nuggets, discover their nutritional value, and delve into their massive cultural reputation.

History of Chicken Nuggets:
The tale of bird nuggets begins in the 1950s whilst Robert C. Baker, a meals technology professor at Cornell University, pioneered the concept of forming minced fowl meat into chunk-sized portions. His invention laid the foundation for what would later emerge as the modern-day fowl nugget. However, it wasn’t until the late Nineteen Seventies that speedy-food giant McDonald’s added their iconic Chicken McNuggets, popularizing the idea and sparking a trend that could sweep the globe.

Nutritional Information:
While undeniably delicious, chook nuggets are regularly criticized for his or her perceived lack of dietary value. However, not all fowl nuggets are created equal. Homemade or exceptional versions might also offer higher nutrients in comparison to their rapid-meals opposite numbers. Generally, chicken nuggets are an excellent source of protein however also can be high in fats, sodium, and energy, specifically while deep-fried. Opting for baked or air-fried nuggets and pairing them with a facet of vegetables can assist make them a extra balanced meal.

Cultural Popularity:
Chicken nuggets have transcended borders and cultural boundaries to become a beloved food item global. From the lunchboxes of American schoolchildren to the menus of upscale eating places, bird nuggets may be found in various forms and flavors throughout the globe. Their versatility makes them suitable for any event, whether it is a brief snack, a celebration appetizer, or a comforting meal. Moreover, the nostalgia associated with bird nuggets often leads adults to indulge in a childhood favored, in addition cementing their cultural importance.

https://spicesaroma.com/veg-biryani/ ‎

Conclusion:
In conclusion, chicken nuggets have come an extended manner considering that their humble beginnings, evolving right into a culinary icon cherished through thousands and thousands around the sector. While their nutritional profile may range depending on how they are organized, there may be no denying the time-honored enchantment of these golden nuggets of goodness. Whether you enjoy them dipped in tangy sauce or nestled in a salad, bird nuggets maintain to maintain a special area in the hearts and stomachs of meals fans anywhere.

Baked Chicken Nuggets Recipe

Ingredients:

1 lb (450g) boneless, skinless bird breasts, reduce into chew-sized portions
1 cup (120g) breadcrumbs (panko or ordinary)
1/4 cup (30g) grated Parmesan cheese
1 teaspoon garlic powder
1 teaspoon paprika
1/2 teaspoon salt
1/four teaspoon black pepper
2 eggs, overwhelmed
Cooking spray

Instructions:

Preheat your oven to four hundred°F (2 hundred°C) and line a baking sheet with parchment paper or lightly grease it with cooking spray.

In a shallow bowl, integrate the breadcrumbs, Parmesan cheese, garlic powder, paprika, salt, and black pepper. Mix nicely to incorporate the substances.

In every other shallow bowl, beat the eggs until properly combined.

chicken nuggets
l

Dip every piece of chicken into the overwhelmed eggs, permitting any excess to drip off.

Coat the chicken pieces in the breadcrumb combination, pressing lightly to make sure the breadcrumbs adhere frivolously.

Place the lined chook nuggets onto the organized baking sheet in a single layer, ensuring they may be now not touching every other.

Lightly spray the tops of the chook nuggets with cooking spray. This will assist them brown and crisp up well within the oven.

Bake within the preheated oven for 15-20 mins, or till the chicken is cooked via and the coating is golden brown and crispy.

Once completed, take away the chicken nuggets from the oven and allow them to cool slightly earlier than serving.

Serve your scrumptious baked fowl nuggets with your favorite dipping sauces, which includes ketchup, barbecue sauce, honey mustard, or ranch dressing.

Enjoy your home made baked chook nuggets as a more healthy opportunity to the fried version, best for a fast and pleasing meal or snack!

chicken nuggets

Deep Fried Chicken Nuggets Recipe ( step by step)

Ingredients:

1 lb (450g) boneless, skinless hen breasts, cut into chunk-sized pieces
2 cups (240g) all-reason flour
2 teaspoons garlic powder
2 teaspoons onion powder
1 teaspoon paprika
1 teaspoon salt
half teaspoon black pepper
2 eggs, beaten
1/4 cup (60ml) milk
Vegetable oil, for frying

https://spicesaroma.com/egg-biryani/
Instructions:

Prepare the Chicken:

Cut the fowl breasts into bite-sized pieces, ensuring they’re uniform in length for even cooking.

Prepare the Dredging Ingredients:

In a shallow bowl, integrate the all-cause flour, garlic powder, onion powder, paprika, salt, and black pepper. Mix well to calmly distribute the spices.

Set up the Dredging Station:

In some other shallow bowl, whisk together the overwhelmed eggs and milk to create an egg wash.

Dredge the Chicken:

Take each piece of bird and coat it in the seasoned flour mixture, shaking off any excess.

Coat with Egg Wash:

Dip the flour-coated chicken pieces into the egg wash, ensuring they’re fully covered.

Recoat with Flour:

Once lined with the egg wash, dredge the bird portions once more within the seasoned flour aggregate, pressing lightly to stick the flour mixture to the hen.

Heat the Oil:

In a deep fryer or massive, heavy-bottomed pot, warmness vegetable oil to 350°F (a hundred and eighty°C). Make sure there may be enough oil to fully submerge the fowl pieces.

Fry the Chicken Nuggets:

Carefully location the coated chook nuggets into the hot oil, some portions at a time, making sure no longer to overcrowd the pot. Fry in batches if necessary.

Fry Until Golden Brown:

Fry the bird nuggets for approximately five-7 minutes, or till they’re golden brown and cooked thru. Use a slotted spoon or tongs to carefully turn the nuggets now and again for even cooking.
Drain and Serve:

Once cooked, get rid of the hen nuggets from the oil and drain them on paper towels to dispose of any excess oil.

https://amzn.to/4bJfRvM
Enjoy:

Serve your crispy and scrumptious deep-fried fowl nuggets hot, alongside your favourite dipping sauces.

Optional:

For an additional crispy coating, you may double-dip the fowl nuggets inside the egg wash and flour mixture before frying.
Enjoy your selfmade deep-fried chook nuggets as a tasty snack or meal choice!

chicken nuggets

Below is a table describes the approximate nutritional value per serving of baked chicken nuggets:

Nutrient Amount Per Serving (1 serving = 4 nuggets)
Calories 220
Total Fat 7g
Saturated Fat 2g
Cholesterol 110mg
Sodium 480mg
Total Carbohydrates 14g
Dietary Fiber 1g
Sugars 1g
Protein 25g

Veg Biryani

veg biryani recipe

Title: Delicious Veg Biryani: A Flavorful Culinary Journey

Introduction:
Welcome to our culinary escapade where we delve into the fragrant global of veg biryani recipe! Biryani, a dish with origins steeped in wealthy records and culture, has traversed centuries to become a loved culinary delight enjoyed by using many around the globe.

In this blog publish, we will explore the intricacies of crafting a tantalizing veg biryani, from deciding on the best components to getting to know the artwork of layering flavors. So, permit’s embark on this flavorful journey together and free up the secrets and techniques to developing a tasty vegetarian biryani so as to sincerely impress your taste buds and leave you longing for extra.

Understanding Biryani:
Before we dive into the recipe, let’s take a moment to understand the essence of biryani. Originating from the kitchens of historic Persia, biryani has evolved through the years, embracing various culinary impacts to emerge as the culinary masterpiece it is today.

At its center, biryani is a harmonious mixture of fragrant basmati rice, fragrant spices, and succulent meat or greens, all cooked together in layers to create a symphony of flavors and textures. While traditionally associated with meat-based sorts, the vegetarian version of biryani gives a pleasing alternative this is similarly enjoyable and bursting with flavors.

Ingredients:

Basmati Rice: The foundation of any biryani, basmati rice provides a sensitive aroma and fluffy texture to the dish.
Assorted Vegetables: Choose a colorful collection of greens together with carrots, peas, potatoes, cauliflower, and bell peppers to feature vibrancy and vitamins to your  veg biryani.

Yogurt: Creamy yogurt now not best tenderizes the greens however also provides a diffused tanginess to the dish.

Aromatic Spices: Key spices like cumin, coriander, cinnamon, cardamom, cloves, and bay leaves infuse the biryani with their distinct flavors and aromas.

Saffron: The golden threads of saffron lend a luxurious touch to the biryani, presenting a wealthy hue and floral fragrance.

Fried Onions: Crispy fried onions add texture and intensity of taste to the biryani, elevating it to new heights of deliciousness.

Ghee or Oil: Use ghee for an actual touch or opt for oil for a lighter version of the biryani.
Fresh Herbs: Garnish your veg biryani with a beneficent sprinkle of sparkling cilantro and mint leaves for a burst of freshness.

Method to prepare veg biryani

Rinse the basmati rice thoroughly underneath cold water till the water runs clear. Soak the rice in water for about 30 minutes, then drain and set aside.

In a big skillet or Dutch oven, warmth ghee or oil over medium heat. Add the whole spices together with cinnamon, cardamom, cloves, and bay leaves, and sauté till fragrant.

Add the sliced onions and sauté till golden brown and caramelized. Remove 1/2 of the fried onions and set aside for garnishing.

Add the assorted veggies to the skillet and cook dinner till they’re slightly soft. Stir in the yogurt and spice powders along with turmeric, coriander, cumin, and chili powder, and prepare dinner for a couple of minutes until the veggies are covered with the spices.

In a separate pot, carry water to a boil and add the soaked and drained rice along with a pinch of salt. Cook the rice till it’s far partly cooked, then drain and set aside.

Layer the partly cooked rice over the vegetable combination in the skillet. Sprinkle saffron-infused milk over the rice, accompanied with the aid of the ultimate fried onions and sparkling herbs.

Cover the skillet with a decent-fitting lid and prepare dinner the  veg biryani over low warmness for approximately 15-20 minutes, allowing the flavors to meld together and the rice to completely cook dinner.

veg biryani recipe
Once the  veg biryani is cooked, gently fluff the rice with a fork, being cautious not to interrupt the grains. Serve hot, garnished with additional sparkling herbs and a aspect of raita or cucumber salad.

https://spicesaroma.com/chicken-65-biryani/
Conclusion:
Congratulations! You have now mastered the artwork of making a mouthwatering veg biryani that is sure to pleasure your senses and impress your family and pals. Whether loved on its personal or paired along with your favorite accompaniments, this fragrant and flavorful dish is sure to end up a staple in your culinary repertoire. So, gather your components, unleash your creativity, and enjoy the magic of veg biryani with every tantalizing chew. Bon appétit!

https://amzn.to/42EHrpX

Here’s a simple and delicious recipe for Veg Biryani:

Ingredients:

2 cups basmati rice
2 onions, thinly sliced
1 cup combined veggies (carrots, peas, potatoes, cauliflower, bell peppers, and so on.)
1 cup yogurt
2 tomatoes, chopped
2 inexperienced chilies, slit lengthwise
1-inch piece of ginger, grated
4 cloves of garlic, minced
1 cinnamon stick
four inexperienced cardamom pods
4 cloves
1 bay leaf
1 teaspoon cumin seeds
1 teaspoon coriander powder
1/2 teaspoon turmeric powder
half of teaspoon crimson chili powder
A pinch of saffron threads soaked in 2 tablespoons of warm milk
Fresh cilantro leaves for garnish
Salt to taste
three tablespoons ghee or oil

veg biryani recipe
Instructions:

Wash the basmati rice very well and soak it in water for about 30 minutes. Drain and set apart.
Heat ghee or oil in a massive pot over medium heat. Add the sliced onions and fry until golden brown. Remove half of the fried onions and set apart for garnish.

https://amzn.to/3uyuNfC
Add the cinnamon stick, cardamom pods, cloves, bay leaf, and cumin seeds to the pot. Sauté for a minute until fragrant.

Add the chopped tomatoes, inexperienced chilies, grated ginger, and minced garlic to the pot. Cook until the tomatoes are smooth and the combination becomes thick.

Add the blended veggies to the pot and prepare dinner for a couple of minutes until they’re barely gentle.
In a bowl, whisk the yogurt until clean. Add the yogurt to the pot at the side of coriander powder, turmeric powder, red chili powder, and salt. Mix nicely to combine.

Add the soaked basmati rice to the pot and lightly blend the whole thing collectively.
Pour enough water into the pot to cowl the rice by way of about an inch. Bring the combination to a boil, then lessen the warmth to low. Cover the pot with a decent-fitting lid and permit the biryani simmer for about 15-20 minutes, or till the rice is cooked and the greens are smooth.

Once the  veg biryani is cooked, remove it from heat and let it take a seat for a few minutes.
Before serving, garnish the biryani with the reserved fried onions, saffron-infused milk, and sparkling cilantro leaves.

Serve hot with raita or cucumber salad at the facet.
        Enjoy your flavorful Veg Biryani!


Here’s a table demonstrating the approximate nutritional values for per serving of the Veg Biryani recipe:

Nutrient Amount per Serving
Calories 350
Total Fat 8g
– Saturated Fat 4g
Cholesterol 10mg
Sodium 500mg
Total Carbohydrates 60g
– Dietary Fiber 5g
– Sugars 6g
Protein 8g

Please note that these values are approximate and may range primarily based on factors such as factor brands, variations in training, and serving sizes. It’s constantly a terrific concept to seek advice from a nutritionist or use a dependable nutritional calculator for unique records tailored in your precise wishes.

Here are some hacks to cook dinner Veg Biryani speedy and nevertheless make it tasty:

Pre-cut Vegetables: Use pre-cut or frozen mixed veggies to store time on slicing. This gets rid of the want for tremendous prep paintings and hurries up the cooking technique.

Instant Pot or Pressure Cooker: Utilize an Instant Pot or strain cooker to prepare dinner the biryani speedy with out compromising on taste. It extensively reduces the cooking time whilst ensuring that the rice and greens are perfectly cooked.

Pre-soak Rice: Pre-soak the basmati rice for about 15-20 minutes even as you prepare the alternative elements. This helps lessen the cooking time and guarantees that the rice chefs evenly.

Use Biryani Masala: Instead of getting ready man or woman spice mixes, opt for save-sold biryani masala to add depth of taste to your dish speedy. It consists of a blend of spices which might be critical for real biryani flavor.

Sauté Onion and Spice Paste: Quickly sauté onions and spices within the stress cooker or Instant Pot earlier than including vegetables and rice. This releases their flavors quicker, infusing the dish with wealthy aromas.

Cook Rice and Vegetables Together: Instead of cooking rice one at a time, layer the soaked rice over the greens within the stress cooker or Instant Pot. This allows the rice to absorb the flavors of the greens and spices whilst cooking together.

Use Frozen Pre-cooked Rice: If you are brief on time, use frozen pre-cooked rice as a convenient alternative. Simply thaw the rice and add it to the cooked vegetables and spices, then steam for a couple of minutes to meld the flavors.

Garnish with Fried Onions and Nuts: Enhance the taste and texture of the biryani via garnishing it with crispy fried onions and toasted nuts. This adds a pleasing crunch and depth of flavor to the dish with out requiring greater cooking time.

By imposing those hacks, you can whip up a scrumptious Veg Biryani in no time, perfect for the ones busy days whilst you crave a flavorful meal without spending hours in the kitchen. Enjoy your quick and engaging biryani introduction!

Egg Biryani

egg biryani

Title: Delicious Egg Biryani: A Flavorful Recipe to Satisfy Your Taste Buds

Introduction:
Egg biryani is a delightful fusion of flavors that mixes the richness of biryani spices with the diffused taste of boiled eggs. This loved dish is perfect for each casual dinners and special occasions. In this weblog publish, I will proportion with you my attempted and tested recipe for making egg biryani that is positive to impress your family and buddies.

Ingredients:

4 eggs
2 cups basmati rice
1 large onion, thinly sliced
2 tomatoes, chopped
2 inexperienced chilies, slit lengthwise
1/2 cup yogurt
1/4 cup chopped cilantro (coriander leaves)
1/4 cup chopped mint leaves
2 tablespoons ginger-garlic paste
Whole spices: 2 bay leaves, 4 cloves, 4 inexperienced cardamoms, 1-inch cinnamon stick
Biryani masala powder: 1 tablespoon
Turmeric powder: 1/2 teaspoon
Red chili powder: 1 teaspoon
Garam masala powder: 1 teaspoon
Salt to flavor
three tablespoons cooking oil or ghee
Saffron strands (non-compulsory)
Fried onions for garnish (non-compulsory)

egg biryanihttps://spicesaroma.com/andhra-chicken-curry/
Instructions:

Hard-boil the eggs: Place the eggs in a saucepan and cowl them with water. Bring the water to a boil, then lessen the warmth and permit the eggs simmer for approximately 10 mins. Once finished, dispose of the eggs from the recent water and allow them to cool. Peel the eggs and set them apart.

Cook the rice: Wash the basmati rice very well and soak it in water for 30 minutes. In a huge pot, carry water to a boil and upload the soaked rice at the side of a few salt. Cook the rice till it’s 70% carried out. Drain the extra water and set the rice aside.

Prepare the masala: Heat oil or ghee in a deep pan or stress cooker. Add the entire spices (bay leaves, cloves, cardamoms, cinnamon) and sauté for a minute until aromatic. Then, add the sliced onions and inexperienced chilies. Cook until the onions flip golden brown.

Add the ginger-garlic paste and sauté till the raw odor disappears. Then, add the chopped tomatoes and cook dinner till they come to be tender and soft.

Now, upload the yogurt, biryani masala powder, turmeric powder, purple chili powder, and salt. Mix properly and cook dinner for a couple of minutes until the oil separates from the masala.

Assemble the biryani: Gently place the boiled eggs on top of the masala within the pan. Sprinkle half of the chopped cilantro and mint leaves over the eggs.

Layer half of the partially cooked rice on top of the masala and unfold it lightly. Sprinkle the remaining cilantro and mint leaves on top of the rice.

If the use of saffron, dissolve it in a tablespoon of warm milk and drizzle it over the rice. This will deliver the biryani a stunning coloration and aroma.

Cover the pan with a decent-becoming lid and cook the biryani on low heat for about 15-20 mins until the rice is completely cooked and fragrant. If the use of a pressure cooker, cook on low flame for one whistle.

Once executed, gently fluff the biryani with a fork, ensuring no longer to interrupt the eggs.

Garnish the egg biryani with fried onions (elective) and serve warm with raita or your preferred aspect dish.

Conclusion:
This egg biryani recipe is a satisfying combo of flavors and textures that is sure to tantalize your flavor buds. Whether you are cooking for a unique occasion or certainly yearning a comforting meal, this dish is bound to be a hit. Give it a try to enjoy the fragrant goodness of self-made egg biryani!

Title: Hyderabadi Style Egg Biryani: A Royal Treat from the Nizami Cuisine

Introduction:
Hyderabadi cuisine is famend for its wealthy and aromatic flavors, and considered one of its crown jewels is the Hyderabadi-fashion egg biryani. This regal dish, steeped in the culinary traditions of the Nizams, combines fragrant basmati rice, boiled eggs, and a symphony of spices to create a meal match for royalty. In this blog publish, I’ll walk you via the stairs to prepare this brilliant dish inside the real Hyderabadi fashion.

Ingredients:

6 eggs
2 cups basmati rice, soaked for half-hour
1 cup thinly sliced onions
1 cup chopped tomatoes
1/2 cup yogurt
1/four cup chopped mint leaves
1/four cup chopped cilantro (coriander leaves)
2 tablespoons ginger-garlic paste
1 tablespoon biryani masala powder
1 tablespoon purple chili powder
1 teaspoon turmeric powder
1 teaspoon garam masala powder
4 tablespoons cooking oil or ghee
Salt to taste
Whole spices: 2 bay leaves, 4 cloves, 4 green cardamoms, 1-inch cinnamon stick
Saffron strands soaked in warm milk (non-compulsory)
Fried onions for garnish (elective)
Instructions:

Hard-boil the eggs: Place the eggs in a saucepan and cover them with water. Bring the water to a boil, then reduce the heat and let the eggs simmer for approximately 10 minutes. Once performed, take away the eggs from the new water, cool them, and peel them. Make shallow cuts at the floor of the eggs and marinate them with a pinch of turmeric powder and salt. Set aside.

egg biryani

Cook the rice: Drain the soaked basmati rice and set it aside. In a large pot, carry water to a boil and add the rice along with some salt. Cook the rice until it is 70% done. Drain the excess water and set the rice apart.

Prepare the masala: Heat oil or ghee in a deep pan or stress cooker. Add the entire spices (bay leaves, cloves, cardamoms, cinnamon) and sauté till aromatic.

Add the sliced onions and fry until golden brown. Add the ginger-garlic paste and cook till the raw odor disappears.

Add the chopped tomatoes and prepare dinner till they turn soft and gentle.

Now, upload the yogurt, biryani masala powder, crimson chili powder, turmeric powder, garam masala powder, and salt. Mix properly and cook till the oil separates from the masala.

Assemble the biryani: Place the marinated boiled eggs lightly on pinnacle of the masala within the pan. Sprinkle 1/2 of the chopped mint leaves and cilantro over the eggs.

Layer half of of the in part cooked rice evenly over the masala and egg layer. Sprinkle the closing mint leaves and cilantro over the rice.

If the usage of saffron, soak the strands in warm milk and drizzle it over the rice for a rich aroma and colour.

Cover the pan with a tight-fitting lid and cook dinner the biryani on low warmth for approximately 15-20 mins until the rice is fully cooked and aromatic. If using a pressure cooker, cook on low flame for one whistle.

Once accomplished, gently fluff the biryani with a fork, ensuring now not to interrupt the eggs.

Garnish the Hyderabadi-fashion egg biryani with fried onions (optional) and serve hot with raita or your favorite aspect dish.

Conclusion:
Indulge in the royal flavors of Hyderabadi cuisine with this exceptional egg biryani recipe. With its aromatic spices and tender boiled eggs, this dish is sure to transport you to the culinary paradise of the Nizams. Treat yourself and your loved ones to this regal delicacy, and savor the richness of Hyderabadi-fashion egg biryani!

Title: Roasted Egg Biryani: A Delectable Twist to the Classic Recipe

Introduction:
Roasted egg biryani offers a completely unique and delightful variation to the traditional biryani, infusing the dish with a smoky taste that elevates its flavor to new heights. In this recipe, we are able to discover how to put together this mouthwatering dish, combining the richness of biryani spices with the diffused charred aroma of roasted eggs.

Ingredients:

6 eggs
2 cups basmati rice
1 huge onion, thinly sliced
2 tomatoes, finely chopped
2 green chilies, slit lengthwise
half of cup yogurt
1/4 cup chopped cilantro (coriander leaves)
1/four cup chopped mint leaves
2 tablespoons ginger-garlic paste
Biryani masala powder: 2 tablespoons
Turmeric powder: 1/2 teaspoon
Red chili powder: 1 teaspoon
Garam masala powder: 1 teaspoon
Salt to flavor
four tablespoons cooking oil or ghee
Whole spices: 2 bay leaves, 4 cloves, 4 green cardamoms, 1-inch cinnamon stick
1/4 cup milk
Saffron strands (non-obligatory)
Fried onions for garnish (optional)
Instructions:

Roast the eggs: Heat a non-stick pan over medium warmness and add a tablespoon of oil. Once the oil is warm, carefully add the boiled and peeled eggs to the pan. Sprinkle a pinch of salt and turmeric powder over the eggs.

Roll the eggs inside the oil to coat them evenly. Allow the eggs to roast for about 5-7 mins, turning them every so often until they broaden a golden-brown crust. Once roasted, dispose of the eggs from the pan and set them aside.

Cook the rice: Wash the basmati rice very well and soak it in water for 30 minutes. In a large pot, convey water to a boil and upload the soaked rice along side a few salt. Cook the rice until it is 70% done. Drain the extra water and set the rice apart.

https://amzn.to/3STRvbj

Prepare the masala: In a separate deep pan or pressure cooker, heat the last oil or ghee. Add the whole spices (bay leaves, cloves, cardamoms, cinnamon) and sauté until aromatic.

Add the sliced onions and green chilies. Cook until the onions turn golden brown.

Add the ginger-garlic paste and sauté till the raw odor disappears.

Stir inside the chopped tomatoes and cook till they become gentle and pulpy.

Now, upload the yogurt, biryani masala powder, turmeric powder, red chili powder, garam masala powder, and salt. Mix nicely and cook dinner for a few minutes till the oil separates from the masala.

Assemble the biryani: Gently vicinity the roasted eggs on top of the masala within the pan. Sprinkle half of the chopped cilantro and mint leaves over the eggs.

Layer half of of the partially cooked rice flippantly over the masala and egg layer. Sprinkle the closing cilantro and mint leaves over the rice.

If using saffron, dissolve it in heat milk and drizzle it over the rice for brought aroma and coloration.

Cover the pan with a tight-fitting lid and cook the biryani on low warmness for approximately 15-20 minutes until the rice is absolutely cooked and fragrant. If using a strain cooker, cook dinner on low flame for one whistle.

Once completed, gently fluff the biryani with a fork, making sure not to interrupt the eggs.

Garnish the  biryani with fried onions (non-compulsory) and serve hot with raita or your favorite aspect dish.

https://amzn.to/3wk4uu4

Conclusion:
Indulge within the irresistible flavors of roasted egg biryani, where the smoky essence of the eggs provides a pleasing twist to this classic dish. With its fragrant spices and gentle roasted eggs, this biryani is certain to become a favorite at your eating table. Treat your self and your family to this delectable recipe and enjoy the rich flavors of roasted egg biryani!

Below is a desk outlining the approximate nutritional.

Nutrient Amount Per Serving
Sodium800mgTotal Carbohydrates60g- Dietary Fiber4g- Sugars3gProtein12gCalories 450 kcal
Total Fat 18g
– Saturated Fat 4g
Cholesterol 240mg

Andhra Chicken Curry

Andhra Chicken Curry

Andhra Chicken Curry

is a tantalizing dish that hails from the coronary heart of South India, famend for its ambitious flavors and fiery spices. This real recipe brings collectively the vibrant tastes of Andhra Pradesh, promising a culinary experience so that it will pride your flavor buds. Get ready to embark on a flavorful journey as we discover the secrets to creating Andhra Chicken Curry at domestic.

Ingredients:

500 grams chook, cut into portions
2 onions, finely chopped
2 tomatoes, finely chopped
2 inexperienced chilies, slit lengthwise
2 tablespoons ginger-garlic paste
1 tablespoon purple chili powder (adjust to taste)
1/2 teaspoon turmeric powder
1 teaspoon coriander powder
1/2 teaspoon cumin powder
half of teaspoon garam masala powder
A handful of clean curry leaves
2 tablespoons oil
Salt to taste
Fresh coriander leaves for garnish

Andhra Chicken Curry
Instructions:

Heat oil in a massive pan or kadhai over medium warmth. Add the chopped onions and sauté until they flip golden brown.
Add the slit green chilies and ginger-garlic paste to the pan. Sauté for a couple of minutes until the uncooked aroma disappears.

Now, upload the chopped tomatoes to the pan and prepare dinner till they turn soft and delicate.
Add the red chili powder, turmeric powder, coriander powder, cumin powder, and salt to the pan. Mix well to mix all of the spices with the onion-tomato aggregate.

Add the chicken pieces to the pan and coat them lightly with the spice mixture.
Cover the pan and prepare dinner the chook on medium-low heat for about 15-20 mins, stirring occasionally, until the bird is cooked thru and smooth.
Once the chook is cooked, add the garam masala powder and clean curry leaves to the pan. Mix nicely and simmer for every other 2-three minutes to allow the flavors to combination.

Taste the curry and adjust the seasoning if needed.
Garnish  your Andhra Chicken Curry with freshly chopped coriander leaves earlier than serving.
Serve hot with steamed rice, roti, or paratha.

Conclusion:
Andhra Chicken Curry is a essential South Indian dish that embodies the bold and spicy flavors of Andhra Pradesh. With its fragrant spices and soft chook pieces, this curry is sure to come to be a fave at your dinner desk. So, roll up your sleeves, accumulate your ingredients, and deal with your self to a flavor of South India with this proper Andhra Chicken Curry recipe.

Title: Crispy Fried Chicken Curry: A Flavorful Twist on a Classic Dish

Introduction:
Fried Andhra Chicken Curry gives a lovely fusion of crispy fried chicken portions immersed in a rich and fragrant curry sauce. This recipe combines the crunchy texture of fried fowl with the formidable flavors of conventional curry, ensuing in a dish that’s positive to tantalize your flavor buds. Follow alongside as we explore the way to create this flavorful and comforting meal.

Ingredients:
For the Fried Andhra Chicken Curry:

500 grams chicken portions (bone-in or boneless)
1 cup all-purpose flour
2 eggs, overwhelmed
1 cup breadcrumbs
1 teaspoon garlic powder
1 teaspoon paprika
Salt and pepper to flavor
Oil for frying

Andhra Chicken Curry
For the Curry Sauce:

2 onions, finely chopped
2 tomatoes, finely chopped
2 green chilies, slit lengthwise
2 tablespoons ginger-garlic paste
1 teaspoon cumin seeds
1 teaspoon coriander powder
1/2 teaspoon turmeric powder
half teaspoon purple chili powder (alter to taste)
1/2 teaspoon garam masala powder
1/4 cup coconut milk (optional)
Fresh coriander leaves for garnish
Salt to taste
Oil for cooking
Instructions:

Start by preparing the fried bird. In a shallow bowl, combine the all-reason flour with garlic powder, paprika, salt, and pepper. In any other bowl, beat the eggs.

Dip each bird piece into the pro flour, then coat it with overwhelmed egg, and subsequently dredge it in breadcrumbs, making sure it is evenly covered. Repeat the manner for all chook portions.

Heat oil in a deep frying pan or skillet over medium-high warmness. Once hot, carefully add the breaded hen pieces in batches and fry until golden brown and crispy on all aspects. Transfer the fried Andhra chicken curry to a plate lined with paper towels to drain extra oil. Set aside.

Cooking Andhra Chicken Curry in an Instant Pot

is a handy and green manner to achieve gentle and flavorful chicken infused with the formidable spices of South India. Here’s a step-through-step guide on a way to make Andhra Chicken Curry in an Instant Pot:

Ingredients:

500 grams bird, cut into pieces
2 onions, finely chopped
2 tomatoes, finely chopped
2 inexperienced chilies, slit lengthwise
2 tablespoons ginger-garlic paste
1 tablespoon purple chili powder (modify to taste)
half teaspoon turmeric powder
1 teaspoon coriander powder
half of teaspoon cumin powder
half of teaspoon garam masala powder
A handful of sparkling curry leaves
2 tablespoons oil
Salt to flavor
Fresh coriander leaves for garnish
Water, as wanted
Instructions:

Turn at the Instant Pot and choose the “Sauté” feature. Heat oil in the internal pot of the Instant Pot.
Add the chopped onions and sauté until they turn golden brown.
Add the slit green chilies and ginger-garlic paste to the pot. Sauté for a few minutes till the uncooked aroma disappears.

Andhra Chicken Curry
Preparation of chicken

Add the chopped tomatoes to the pot and prepare dinner until they turn tender and tender.
Add the red chili powder, turmeric powder, coriander powder, cumin powder, and salt to the pot. Mix nicely to combine all of the spices with the onion-tomato mixture.

Add the bird pieces to the pot and coat them lightly with the spice aggregate.
Cancel the “Sauté” function and close the lid of the Instant Pot. Ensure the stress valve is about to the “Sealing” position.

Select the “Pressure Cook” or “Manual” mode and set the timer for eight-10 minutes on excessive stress, depending on the dimensions of the chicken portions.
Once the cooking cycle is whole, allow natural stress launch for five-10 minutes, then carefully perform a brief strain launch by means of turning the strain valve to the “Venting” role.

Open the lid of the Instant Pot and upload the garam masala powder and sparkling curry leaves to the chicken curry. Mix nicely.

If the curry is just too thick, add a few water to acquire the favored consistency.
Taste the curry and alter the seasoning if wanted.

Garnish with freshly chopped coriander leaves earlier than serving.
Serve warm with steamed rice, roti, or paratha.
Enjoy your scrumptious Andhra Chicken Curry cooked to perfection inside the Instant Pot!

Introduction to Andhra Pradesh:

Nestled within the southeastern part of India, Andhra Pradesh is a nation famend for its wealthy cultural history, colourful traditions, and diverse landscapes. With a history courting returned heaps of years, Andhra Pradesh has been a cradle of civilization, witnessing the rise and fall of potent dynasties and the flourishing of artwork, literature, and structure.

The state is characterized by means of its numerous geography, ranging from lush coastal plains alongside the Bay of Bengal to the rugged hills of the Eastern Ghats and the fertile plains of the Deccan plateau. This geographical variety has endowed Andhra Pradesh with a wealth of herbal sources, making it an agricultural powerhouse and a hub for industries such as textiles, prescribed drugs, and information technology.

Andhra Pradesh boasts a wealthy cultural tapestry, shaped by the contributions of various dynasties, including the Satavahanas, Pallavas, Cholas, Kakatiyas, and Vijayanagara Empire. Each dynasty has left its imprint on the state’s architecture, cuisine, language, and traditions, creating a unique blend of impacts that is surprisingly Andhra.

The kingdom is famend for its colourful fairs, colourful people dances, and melodious music, which mirror the cultural variety and the spirit of its human beings. From the exuberant celebrations of Sankranti and Ugadi to the captivating performances of Kuchipudi dance and Carnatic track, Andhra Pradesh is a treasure trove of cultural reviews.

Andhra Pradesh is also famous for its delectable cuisine, which is characterized by way of its bold flavors, spicy curries, and fragrant spices. From the fiery flavors of Andhra-style chicken and mutton dishes to the subtle sweetness of Telugu candies like Pootharekulu and Bobbatlu, the country’s delicacies is a culinary pleasure for meals lovers.

https://amzn.to/3uw24Iq

In current years, Andhra Pradesh has emerged as a dynamic financial powerhouse, with a focus on infrastructure development, commercial growth, and innovation. The state’s capital, Amaravati, is poised to come to be a global-magnificence town, even as towns like Visakhapatnam, Vijayawada, and Tirupati maintain to thrive as facilities of trade, training, and tourism.

With its rich history, cultural historical past, and financial capability, Andhra Pradesh stands as a testament to the spirit of resilience, variety, and development that defines contemporary India. As the country continues to forge in advance on its direction of improvement, it stays a land of possibility and promise, welcoming site visitors from round the sector to discover its myriad treasures.

https://spicesaroma.com/masala-dosa/

Masala dosa:

masala dosa

Title: The Irresistible Delight: Exploring the World of Masala Dosa

Introduction:
Masala Dosa, with its crispy texture and flavorful filling, is a liked South Indian dish that has captured the hearts and taste buds of meals fans global. In this blog publish, we embark on a satisfying adventure to discover the secrets behind this iconic dish, from its origins to its modern-day variations.

masala dosa

Origins and History:
The history of Masala Dosa dates lower back centuries, originating inside the southern Indian state of Karnataka. Legend has it that it became first created inside the Udupi kitchens of the famous Sri Krishna Temple. Initially a easy dish made from rice and lentils, Masala Dosa has evolved over the years, influenced with the aid of various culinary traditions and regional possibilities.

The Making of Masala Dosa:
Masala Dosa is crafted from fermented rice and lentil batter, which is unfold thinly on a warm griddle to form a crispy crepe-like base. The dosa is then filled with a spicy potato mixture, commonly pro with mustard seeds, curry leaves, onions, and spices like turmeric and chili powder. The dosa is folded over the filling to create a deliciously flavorful deal with.

Variations and Innovations:
While the traditional Masala Dosa stays a undying traditional, cooks and home cooks have experimented with severa versions and improvements. From cheese and paneer fillings to unconventional toppings like avocado and salsa, the opportunities are countless. Some areas even offer candy versions of the dosa, full of jaggery and coconut.

Health Benefits:
Beyond its delectable taste, Masala Dosa offers several fitness blessings. It is certainly gluten-unfastened and coffee in energy, making it a popular preference for people with dietary restrictions or weight-aware individuals. The fermentation method enhances the dosa’s nutritional price, making it less difficult to digest and promoting intestine fitness.

Serving Suggestions:
Masala Dosa is usually served warm, observed by means of a variety of chutneys and sambar, a flavorful lentil-based stew. Coconut chutney, tomato chutney, and mint chutney are popular accompaniments, including a burst of flavor to each chunk. Some eateries also serve Masala Dosa with a facet of highly spiced potato bhaji or tangy pickles.

Where to Enjoy:
While Masala Dosa is a staple of South Indian cuisine, it has received reputation worldwide, with restaurants and avenue companies imparting their precise take in this iconic dish. Whether you are in Bangalore, London, or New York City, you are likely to discover a scrumptious Masala Dosa waiting to tantalize your flavor buds.

masala dosa

In conclusion, Masala Dosa is extra than only a dish—it is a culinary masterpiece that celebrates the wealthy flavors and vibrant traditions of South India. From its humble beginnings to its worldwide attraction, Masala Dosa maintains to satisfaction meals fanatics of all ages. So, the subsequent time you’re yearning a taste of India, indulge in the impossible to resist delight of Masala Dosa and have fun with each crispy, flavorful chew.

Title: Authentic Masala Dosa Recipe: A Flavorful South Indian Delight

Introduction:
Embark on a culinary adventure with this real Masala Dosa recipe, instantly from the coronary heart of South India. Crispy on the outdoor, smooth at the inside, and bursting with aromatic spices, Masala Dosa is a delightful treat for the senses. Follow these simple steps to recreate this beloved dish in your very own kitchen.

Ingredients:

1 cup long-grain white rice
half of cup urad dal (cut up black lentils)
1/4 cup chana dal (split chickpeas)
1/2 teaspoon fenugreek seeds
Salt to taste
Water (for soaking and grinding)
Oil (for cooking dosas)
For the potato filling:
three-four medium potatoes, boiled and mashed
1 onion, finely chopped
2 green chilies, finely chopped
1 teaspoon mustard seeds
1 teaspoon cumin seeds
A pinch of asafoetida (hing)
half teaspoon turmeric powder
A few curry leaves
Salt to taste
Fresh coriander leaves for garnish

Instructions:

Wash the rice, urad dal, chana dal, and fenugreek seeds very well and soak them in water for 6-8 hours or in a single day.
After soaking, drain the water and grind the rice and dal aggregate to a clean batter, adding water as needed. The batter have to have a thick pouring consistency.
Transfer the batter to a huge bowl, add salt to taste, and mix properly. Allow the batter to ferment in a heat region for 8-10 hours or till it doubles in extent.

To put together the potato filling, warmth oil in a pan and upload mustard seeds. When the seeds begin to splutter, add cumin seeds, asafoetida, and curry leaves.

Add chopped onions and green chilies to the pan and sauté till the onions turn translucent.
Add turmeric powder and mashed potatoes to the pan, together with salt to taste. Mix well and cook for two-three minutes. Remove from warmness and set aside.

Heat a non-stick dosa tawa (griddle) over medium warmth. Once hot, pour a ladleful of the dosa batter onto the middle of the tawa and spread it in a round motion to form a thin layer.

Drizzle oil round the edges of the dosa and cook until the bottom turns golden brown and crispy.
Spread a spoonful of the organized potato filling in the center of the dosa and fold it over to form a semi-circle or roll it right into a cylinder.

Serve hot with coconut chutney, sambar, or your favorite accompaniments. Garnish with fresh coriander leaves for additonal taste.

Conclusion:
With its impossible to resist mixture of textures and flavors, Masala Dosa is positive to come to be a fave on your household. Whether loved for breakfast, lunch, or dinner, this iconic South Indian dish is assured to satisfaction your flavor buds and delivery you to the bustling streets of India.

Title: Masala Dosa Madras Style: A Spicy Twist on a South Indian Classic

Introduction:
Masala Dosa, a cherished dish hailing from South India, gets a fiery makeover in this Madras-style rendition. Bursting with formidable flavors and aromatic spices, Masala Dosa Madras Style promises a culinary adventure as a way to tantalize your flavor buds. Follow alongside as we find the secrets and techniques to creating this highly spiced satisfaction on your very own kitchen.

Ingredients:
For the Dosa Batter:

2 cups lengthy-grain white rice
half cup urad dal (break up black lentils)
1/4 cup chana dal (break up chickpeas)
half of teaspoon fenugreek seeds
Salt to flavor
Water (for soaking and grinding)
Oil (for cooking dosas)
For the Spicy Potato Filling:

four medium potatoes, boiled and mashed
1 onion, finely chopped
2-three inexperienced chilies, finely chopped
1 teaspoon mustard seeds
1 teaspoon cumin seeds
half teaspoon turmeric powder
1 teaspoon red chili powder (regulate to taste)
A pinch of asafoetida (hing)
A few curry leaves
Salt to flavor
Fresh coriander leaves for garnish

Instructions:

Prepare the dosa batter by means of washing the rice, urad dal, chana dal, and fenugreek seeds thoroughly. Soak them in water for six-8 hours or overnight.

Drain the soaked components and grind them to a clean batter, adding water as wanted. Season the batter with salt and allow it to ferment for 8-10 hours or till doubled in extent.
For the spicy potato filling, warmth oil in a pan and upload mustard seeds. Once they start to splutter, upload cumin seeds, asafoetida, and curry leaves.

Add chopped onions and green chilies to the pan and sauté till the onions turn golden brown.
Stir in turmeric powder, red chili powder, and mashed potatoes. Mix well and cook for 2-3 minutes. Adjust seasoning with salt and set aside.

Heat a non-stick dosa tawa (griddle) over medium warmth. Pour a ladleful of dosa batter onto the middle of the tawa and unfold it into a skinny circle.

Drizzle oil around the edges of the dosa and cook dinner till the bottom turns golden brown and crispy.
Spread a generous part of the spicy potato filling over the dosa and fold it in 1/2 or roll it right into a cylinder.
Serve warm with coconut chutney, tomato chutney, or sambar. Garnish with fresh coriander leaves for an extra burst of taste.

Read more

payasam: 3 super tasty recipe that tantalize taste buds

PAYASAM

Title: Heavenly Delights: Traditional Indian Payasam Recipe

Introduction:
In the wealthy tapestry of Indian delicacies, few desserts command as lots reverence as the divine Payasam. This luscious candy deal with, steeped in culture and records, holds a cherished vicinity in festive gatherings, spiritual ceremonies, and own family celebrations. Its velvety texture and excellent mixture of flavors tantalize the flavor buds, leaving an indelible mark of delight and pleasure.

Join us on a culinary journey as we unravel the secrets and techniques of crafting the ideal Payasam, a essential delicacy that embodies the essence of Indian hospitality and heat.

1)PAYASAM 

Ingredients:

1 cup of Basmati rice
1 liter of full-fats milk
1 cup of sugar (alter to flavor)
1/4 cup of ghee (clarified butter)
10-12 cashew nuts
10-12 raisins
4-5 cardamom pods, crushed
A pinch of saffron strands

Optional: some strands of fit for human consumption camphor (Pacha Karpooram) for aromatic essence

Instructions:

Wash the Basmati rice very well beneath running water till the water runs clear. Soak the rice in water for about half-hour.

In a heavy-bottomed pan, carry the milk to a gentle boil over medium heat. Stir now and again to save you it from sticking to the bottom of the pan.

Drain the soaked rice and upload it to the boiling milk. Reduce the heat to low and let the rice cook slowly, stirring now and again, till it becomes tender and smooth, and the milk thickens. This process may additionally take round 30-40 minutes.

While the rice is cooking, warmth ghee in a separate small pan. Add cashew nuts and raisins, and fry them till they flip golden brown. Remove them from the ghee and set aside.

Once the rice is cooked and the milk has thickened to a creamy consistency, upload sugar and crushed cardamom pods. Stir well until the sugar dissolves completely.

Add the fried cashew nuts and raisins to the Payasam and mix nicely.

Crush the saffron strands among your hands and add them to the Payasam, in conjunction with a pinch of suitable for eating camphor if the use of. This step provides a lovely aroma and taste to the dessert.

Allow the Payasam to simmer for some other 5-10 mins, stirring now and again, to permit all the flavors meld together.

Once completed, dispose of the Payasam from the warmth and let it cool barely before serving.

Serve the warm Payasam in character bowls or cups, garnished with a few greater saffron strands and fried cashew nuts on top for an extra touch of indulgence.

Conclusion:
Indulge your senses inside the sublime ecstasy of this conventional Indian Payasam, a symphony of flavors that transports you to a realm of happy contentment. Whether shared with cherished ones in the course of festive occasions or savored as a comforting deal with on a relaxed evening, this iconic dessert embodies the essence of culinary mastery and cultural historical past. So cross beforehand, immerse yourself within the magic of Payasam, and create unforgettable memories with each spoonful of this heavenly delight.

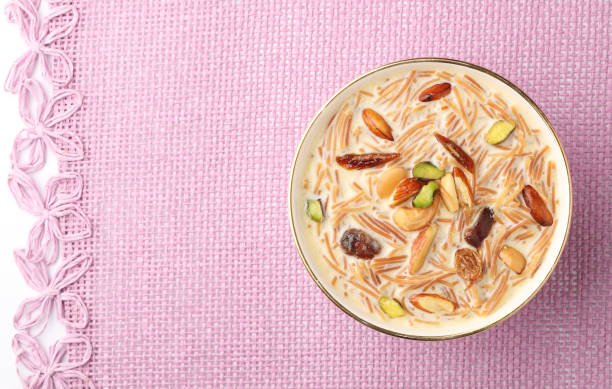
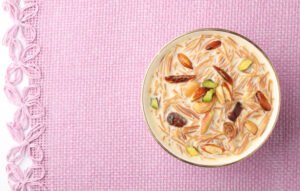
2) PAYASAM WITH VERMICELLI
Introduction:

https://amzn.to/49sBpeu
Embark on a culinary adventure filled with flavors and traditions as we delve into the world of Vermicelli Payasam, a cherished dessert in Indian cuisine. This pleasant concoction, providing first-rate vermicelli strands cooked to perfection in creamy milk and sweetened with sugar, is a heavenly deal with that brings pleasure to each palate.

Join us as we resolve the steps to create this tremendous delicacy, perfect for festive occasions, own family gatherings, or certainly as a decadent indulgence on any day.


Ingredients:

1 cup of roasted vermicelli
1 liter of full-fat milk
three/4 cup of sugar (adjust to flavor)
2 tablespoons of ghee (clarified butter)
10-12 cashew nuts
10-12 raisins
4-five cardamom pods, overwhelmed
A pinch of saffron strands
Optional: some strands of suitable for eating camphor (Pacha Karpooram) for aromatic essence

Instructions:

Heat ghee in a heavy-bottomed pan over medium warmness. Add the roasted vermicelli and roast it till it turns golden brown, stirring constantly to make certain even browning. This step adds a rich nutty flavor to the Payasam.

Once the vermicelli is evenly roasted, pour within the milk and convey it to a gentle boil, stirring on occasion to prevent the milk from sticking to the lowest of the pan.

Reduce the heat to low and let the vermicelli simmer within the milk until it softens and absorbs the creamy texture, stirring now and again to save you lumps from forming. This technique may also take around 10-15 mins.

While the vermicelli is cooking, warmth ghee in a separate small pan. Add cashew nuts and raisins, and fry them till they flip golden brown. Remove them from the ghee and set aside.

Once the vermicelli is cooked and the milk has thickened to a creamy consistency, upload sugar and crushed cardamom pods. Stir properly until the sugar dissolves absolutely.

Add the fried cashew nuts and raisins to the Payasam and blend well.

Crush the saffron strands among your arms and upload them to the Payasam, along with a pinch of fit to be eaten camphor if the use of. This step enhances the aroma and elevates the taste profile of the dessert.

Allow the Payasam to simmer for some other five-10 mins, stirring every so often, to permit all of the flavors meld together.

Once done, eliminate the Payasam from the warmth and let it cool barely before serving.

Serve the nice and cozy Vermicelli Payasam in individual bowls or cups, garnished with some greater saffron strands and fried cashew nuts on top for an additional contact of decadence.

PAYASAM

Conclusion:
Indulge inside the heavenly bliss of Vermicelli Payasam, a classic Indian dessert that captivates the senses with its wealthy aroma and creamy texture. Whether loved throughout festive celebrations or as a candy finishing to a meal, this amazing delicacy is positive to depart an enduring affect for your flavor buds. So collect your components and embark on a culinary adventure to create memories of pure pride with every spoonful of this divine deal with.

3)SUGAR FREE PAYASAM

Introduction:
Embrace the essence of sweetness without the guilt with our tantalizing Sugar-Free Payasam recipe. This delectable dessert offers all of the richness and taste of conventional Payasam at the same time as being gentle on your waistline and suitable for the ones searching for alternatives to refined sugar. Indulge inside the creamy goodness of this guilt-unfastened treat, best for fulfilling your sweet cravings without compromising on taste.

Ingredients:

1 cup of Basmati rice
1 liter of unsweetened almond milk (or any milk of your desire)
half of cup of powdered stevia (adjust to taste)
1 tablespoon of ghee (clarified butter)
10-12 cashew nuts
10-12 raisins
4-5 cardamom pods, overwhelmed
A pinch of saffron strands

Instructions:

Wash the Basmati rice thoroughly below going for walks water until the water runs clear. Soak the rice in water for about 30 minutes.

In a heavy-bottomed pan, convey the almond milk to a mild boil over medium warmth. Stir every so often to prevent it from sticking to the bottom of the pan.

Drain the soaked rice and upload it to the boiling almond milk. Reduce the heat to low and let the rice prepare dinner slowly, stirring every now and then, until it becomes tender and tender, and the milk thickens. This procedure may also take round 30-40 mins.

While the rice is cooking, warmness ghee in a separate small pan. Add cashew nuts and raisins, and fry them till they flip golden brown. Remove them from the ghee and set aside.

Once the rice is cooked and the almond milk has thickened to a creamy consistency, add powdered stevia and beaten cardamom pods. Stir nicely until the stevia dissolves completely.

Add the fried cashew nuts and raisins to the Payasam and mix nicely.

Crush the saffron strands between your palms and add them to the Payasam, allowing the flavors to meld together.

Let the Payasam simmer for some other five-10 mins, stirring every so often, to beautify the flavors.

Once achieved, put off the Payasam from the heat and allow it cool slightly earlier than serving.

Serve the warm Sugar-Free Payasam in man or woman bowls or cups, garnished with some more saffron strands and fried cashew nuts on top for an additional contact of indulgence.

Conclusion:
Savor the guilt-free indulgence of Sugar-Free Payasam, a lovely dessert that proves you may have your sweetness without the sugar. With its creamy texture and fragrant flavors, this recipe promises to fulfill your cravings even as keeping your fitness desires intact. So go beforehand, treat your self to a bowl of this divine pride and revel in the joy of mindful indulgence.

4)PAYASAM WITH JAGGERY

Introduction:

Experience the divine essence of way of life with our great Jaggery Payasam recipe. Enriched with the herbal sweetness of jaggery, this decadent dessert captures the soulful flavors of Indian delicacies. Join us on a culinary journey as we combo creamy textures, aromatic spices, and the rich caramel notes of jaggery to create a Payasam as a way to pride your senses and warm your heart.

Ingredients:

1 cup of Basmati rice
1 liter of full-fats milk
1 cup of grated jaggery (adjust to taste)
2 tablespoons of ghee (clarified butter)
10-12 cashew nuts
10-12 raisins
4-five cardamom pods, beaten
A pinch of saffron strands
Instructions:

Wash the Basmati rice very well beneath running water until the water runs clear. Soak the rice in water for about half-hour.

In a heavy-bottomed pan, deliver the milk to a gentle boil over medium warmth. Stir from time to time to prevent it from sticking to the bottom of the pan.

Drain the soaked rice and upload it to the boiling milk. Reduce the warmth to low and let the rice cook slowly, stirring from time to time, until it turns into soft and gentle, and the milk thickens. This manner may also take round 30-40 minutes.

While the rice is cooking, heat ghee in a separate small pan. Add cashew nuts and raisins, and fry them till they flip golden brown. Remove them from the ghee and set apart.

Once the rice is cooked and the milk has thickened to a creamy consistency, add grated jaggery and beaten cardamom pods. Stir properly till the jaggery dissolves absolutely.

Add the fried cashew nuts and raisins to the Payasam and mix well.

Crush the saffron strands among your arms and add them to the Payasam, allowing the flavors to infuse.

Let the Payasam simmer for some other five-10 mins, stirring sometimes, to enhance the flavors.

Once finished, put off the Payasam from the warmth and allow it cool slightly before serving.

Serve the warm Jaggery Payasam in individual bowls or cups, garnished with a few extra saffron strands and fried cashew nuts on pinnacle for an additional contact of indulgence.

PAYASAM

Conclusion:
Indulge within the soulful richness of Jaggery Payasam, a undying dessert that pays homage to the flavors of tradition. With its velvety texture and comforting sweetness, this recipe guarantees to elevate your eating enjoy and create lasting reminiscences with loved ones. So accumulate your elements, embrace the warmth of jaggery, and immerse your self in the glad pride of this heavenly deal with.

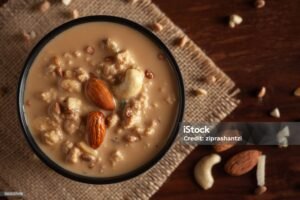
5)PAYASAM WITH DATES( NO SUGAR)

Introduction:
Indulge within the healthful sweetness of nature with our pleasant Date-Sweetened Payasam recipe. By harnessing the natural sugars of dates, this luscious dessert gives a guilt-unfastened indulgence that satisfies your cravings whilst nourishing your frame. Join us as we infuse creamy textures with the rich flavors of dates, creating a Payasam that isn’t best scrumptious but also full of healthful goodness.

Ingredients:

1 cup of Basmati rice
1 liter of complete-fats milk
1 cup of pitted dates, chopped
2 tablespoons of ghee (clarified butter)
10-12 cashew nuts
10-12 raisins
4-5 cardamom pods, crushed
A pinch of saffron strands
Instructions:

Wash the Basmati rice very well under walking water until the water runs clear. Soak the rice in water for approximately 30 minutes.

In a heavy-bottomed pan, convey the milk to a gentle boil over medium warmth. Stir once in a while to prevent it from sticking to the lowest of the pan.

Drain the soaked rice and upload it to the boiling milk. Reduce the warmth to low and let the rice cook dinner slowly, stirring sometimes, till it will become tender and smooth, and the milk thickens. This process may also take round 30-40 minutes.

While the rice is cooking, warmth ghee in a separate small pan. Add cashew nuts and raisins, and fry them until they flip golden brown. Remove them from the ghee and set aside.

Once the rice is cooked and the milk has thickened to a creamy consistency, add chopped dates and beaten cardamom pods. Stir well until the dates melt and mix into the Payasam.

Add the fried cashew nuts and raisins to the Payasam and mix nicely.

Crush the saffron strands among your fingers and upload them to the Payasam, permitting the flavors to meld together.

Let the Payasam simmer for every other five-10 mins, stirring now and again, to enhance the flavors.

Once executed, take away the Payasam from the warmth and let it cool slightly before serving.

Serve the warm Date-Sweetened Payasam in character bowls or cups, garnished with some greater saffron strands and fried cashew nuts on top for a further touch of indulgence.

Conclusion:
Savor the herbal sweetness of dates in each spoonful of our Date-Sweetened Payasam, a healthful dessert that delights the senses and nourishes the soul. With its creamy texture and rich flavors, this recipe gives a guilt-loose indulgence that you can revel in with peace of thoughts. So deal with yourself to a bowl of this divine pleasure and revel in the pure bliss of nature’s sweetness.

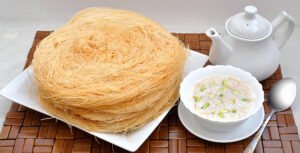
7)  Authentic Muslim-Style Semiya Payasam Recipe

PAYASAM

Introduction:
Step into the world of culinary historical past with our Authentic Muslim-Style Semiya Payasam recipe. Enriched with the traditions and flavors passed down through generations, this decadent dessert holds a special region in Muslim cuisine. Join us as we explore the art of crafting creamy vermicelli Payasam, infused with fragrant spices and the richness of milk, to create a symphony of flavors that captivate the senses and warm the coronary heart.

Ingredients:

1 cup of roasted vermicelli (semiya)
1 liter of complete-fat milk
three/4 cup of jaggery, grated (adjust to taste)
2 tablespoons of ghee (clarified butter)
10-12 cashew nuts
10-12 raisins
four-five cardamom pods, beaten
1/four teaspoon of floor cinnamon
A pinch of saffron strands
Instructions:

Heat ghee in a heavy-bottomed pan over medium warmth. Add the roasted vermicelli and roast it till it turns golden brown, stirring constantly to ensure even browning and save you burning.

Once the vermicelli is frivolously roasted, pour inside the milk and bring it to a mild boil, stirring once in a while to save you sticking.

Reduce the warmth to low and allow the vermicelli simmer within the milk until it softens and absorbs the creamy texture, stirring on occasion to prevent lumps from forming. This technique may additionally take round 10-15 mins.

While the vermicelli is cooking, warmth a separate pan and add cashew nuts and raisins. Fry them until the cashews flip golden brown and the raisins plump up. Remove from heat and set apart.

Once the vermicelli is cooked and the milk has thickened to a creamy consistency, add grated jaggery, beaten cardamom pods, and floor cinnamon. Stir nicely till the jaggery dissolves absolutely and the flavors meld collectively.

Add the fried cashew nuts and raisins to the Payasam and mix nicely.

Crush the saffron strands between your fingers and add them to the Payasam, allowing the aroma to infuse.

Let the Payasam simmer for any other five-10 minutes, stirring sometimes, to beautify the flavors.

Once done, take away the Payasam from the heat and let it cool slightly before serving.

Serve the warm Muslim-Style Semiya Payasam in character bowls or cups, garnished with a few greater saffron strands and fried cashew nuts on pinnacle for an real touch.

PAYASAM

Conclusion:
Delight within the rich flavors and aromatic spices of our Authentic Muslim-Style Semiya Payasam, a cherished dessert that embodies the essence of lifestyle and hospitality. Whether enjoyed during festive celebrations or loved moments with loved ones, this timeless recipe promises to create memories that final an entire life. So immerse yourself within the warm temperature of this delightful deal with and get pleasure from the culinary legacy of Muslim delicacies.

https://spicesaroma.com/chicken-65-biryani/

Chicken 65 Biryani

Chicken 65 Biryani

Title: The Perfect Chicken 65 Biryani: A Flavorful Fusion

Introduction:

Welcome to the tantalizing world of Indian delicacies, where flavors dance to your palate and aromas captivate your senses. Today, we embark on a culinary journey with a fusion dish that mixes the fiery pride of Chicken sixty five with the wealthy indulgence of Biryani. Yes, you heard it right – Chicken 65 Biryani! Brace your self for a mouthwatering adventure as we discover the recipe and secrets behind this culinary masterpiece.

Here are some exciting statistics approximately Chicken 65 Biryani:

Origin: Chicken 65 Biryani is a fusion dish that combines factors from popular Indian dishes: Chicken 65 and Biryani. Chicken 65 is a spicy, deep-fried chook dish originating from Chennai, India, at the same time as Biryani is a fragrant rice dish cooked with meat, spices, and herbs.

Flavorful Fusion: This dish brings together the fiery flavors of Chicken 65 with the fragrant richness of Biryani, developing a completely unique and tantalizing culinary enjoy. The spicy and crispy bird complements the fragrant rice flawlessly, resulting in a dish this is each comforting and thrilling.

Regional Variations: Like many Indian dishes, Chicken 65  Biryani will have local versions based totally on neighborhood tastes and possibilities. Different areas may additionally upload their own twist to the recipe, incorporating nearby spices and components to beautify the flavor profile.

Popularity: While Chicken 65 Biryani may not be as famous as traditional Chicken Biryani or Chicken sixty five on their own, it has received reputation in current years, specially among food lovers who revel in experimenting with fusion cuisine. Its precise aggregate of flavors and textures has earned it a place on the menus of many Indian restaurants and eateries.

Versatility: One of the outstanding things approximately Chicken 65 Biryani is its versatility. It can be customized to fit specific dietary options and tastes. For instance, vegetarians could make a vegetarian version by way of substituting the hen with paneer or combined greens, while people who prefer a milder taste can adjust the amount of spices used inside the recipe.

Perfect Party Dish: Chickenv 65  Biryani is regularly served at gatherings, celebrations, and events due to its brilliant presentation and delicious taste. It’s a dish this is positive to electrify guests and go away them asking for seconds.

Culinary Creativity: Creating Chicken 65 Biryani allows cooks and home chefs to unharness their creativity in the kitchen. From experimenting with unique spice blends to adding specific substances, there are countless possibilities for placing a personal spin on this fusion dish.

Balanced Meal: With its combination of protein-rich hen and carbohydrates from the rice, Chicken 65 Biryani may be taken into consideration a balanced meal. The addition of fragrant spices and herbs not best enhances the taste however also provides diverse fitness blessings.

Cultural Significance: Food plays an fundamental function in Indian culture, and dishes like Chicken sixty five Biryani are regularly loved at some point of festivals, celebrations, and special events. Sharing a meal with loved ones is a loved culture, and this fusion dish provides a modern twist to age-vintage culinary customs.

Global Appeal: While Chicken 65 Biryani has its roots in Indian cuisine, it has also received recognition amongst food fans worldwide. Its bold flavors and comforting traits have made it a favorite amongst the ones in search of to explore the numerous and scrumptious international of Indian meals.

https://amzn.to/3ur3Fz8


Ingredients:

500g Basmati rice
500g boneless chook, reduce into small portions
1 cup yogurt
2 onions, thinly sliced
2 tomatoes, chopped
four inexperienced chilies, slit
1 tablespoon ginger-garlic paste
1 teaspoon turmeric powder
1 teaspoon red chili powder
1 teaspoon garam masala
1 teaspoon cumin seeds
half cup chopped coriander leaves
half cup chopped mint leaves
Juice of 1 lemon
Salt to taste
Oil for frying
For the Chicken 65 Marinade:

2 tablespoons ginger-garlic paste
1 tablespoon red chili powder
1 tablespoon coriander powder
1 tablespoon cornflour
1 tablespoon rice flour
1 egg
Salt to taste
Oil for frying

Chicken 65 Biryanihttps://spicesaroma.com/malai-kofta-exquisite-malai-kofta-recipes/
Instructions:

Marinate the fowl portions with all the components indexed below “Chicken 65 Marinade” for as a minimum half-hour.

Heat oil in a deep pan and fry the marinated bird portions until they may be crispy and golden brown. Remove them from the oil and set apart.

In a separate pan, heat oil and upload cumin seeds. Once they splutter, upload sliced onions and inexperienced chilies. Sauté until the onions turn golden brown.

Add ginger-garlic paste and sauté for a couple of minutes till the uncooked smell disappears.

Add chopped tomatoes and prepare dinner until they flip soft.

Now, add turmeric powder, crimson chili powder, and garam masala. Mix properly and cook for any other few minutes.

Add yogurt, chopped coriander leaves, and mint leaves. Stir continuously and cook till the oil separates from the masala.

In a huge pot, boil water and upload salt. Cook the Basmati rice until it is 70% executed. Drain the water and set aside.

In a heavy-bottomed vessel, layer half of of the cooked rice at the bottom.

Place the fried chook portions evenly on pinnacle of the rice layer.

Spread the prepared masala aggregate over the fowl layer.

Add the ultimate rice on pinnacle of the masala layer.

Squeeze lemon juice over the rice and sprinkle a few chopped coriander and mint leaves.

Cover the vessel with a good lid and prepare dinner on low warmth for approximately 15-20 minutes or until the rice is fully cooked and aromatic.

Once achieved, gently mix the layers earlier than serving.

Serve warm with raita and enjoy the explosion of flavors in each chunk!

Conclusion:
The Chicken 65 Biryani isn’t just a dish; it is a party of flavors, textures, and aromas. With its spicy kick and aromatic rice, it is sure to depart an enduring impact for your taste buds. So, gather your elements, don your chef’s hat, and embark on a culinary journey that guarantees to satisfaction and fulfill. Bon appétit!

Malai Kofta: “Exquisite Malai Kofta Recipe in 2024

Title: Indulge in Delight: Exploring the Richness of Malai Kofta

Introduction:

In the vibrant tapestry of Indian delicacies, Malai Kofta stands proud as a culinary masterpiece that tantalizes the flavor buds with its wealthy flavors and creamy textures. This vegetarian pride, hailing from the heart of North India, combines luscious koftas (dumplings) with a velvety tomato-primarily based gravy infused with aromatic spices. In this weblog, we embark on a culinary adventure to uncover the amazing charm of Malai Kofta, from its origins and elements to its guidance and serving pointers.

Origins and Cultural Significance:
Malai Kofta traces its roots to Mughlai cuisine, famend for its opulent dishes in shape for royalty. The phrase “Malai” interprets to “cream,” reflecting the luxuriousness of the dish, even as “Kofta” refers to savory dumplings normally made from minced vegetables or paneer (Indian cottage cheese). This dish has come to be a beloved staple in Indian cuisine, frequently served at festive occasions, weddings, and celebratory feasts as a image of indulgence and hospitality.

Ingredients:
The hallmark of Malai Kofta lies in its indulgent mixture of ingredients, cautiously decided on to create a symphony of flavors and textures. The koftas are traditionally made from a mixture of mashed potatoes, paneer, cashews, almonds, raisins, and fragrant spices consisting of garam masala, coriander, and cumin. The gravy is prepared from a base of tomatoes, onions, ginger, garlic, and a medley of spices, enriched with cream, butter, and every now and then cashew paste for delivered richness.

Preparation:
Creating Malai Kofta is a labor of love, requiring patience, precision, and attention to detail. The process begins through preparing the kofta mixture, combining mashed potatoes, crumbled paneer, finely chopped nuts, raisins, and spices. The mixture is shaped into small balls or oval-shaped dumplings, which might be then deep-fried until golden brown and crispy at the outdoor, yet soft and succulent at the internal.

Meanwhile, the gravy is ready via sautéing onions, tomatoes, ginger, garlic, and spices until they shape a aromatic and flavorful base. The combination is then pureed and simmered with cream, butter, and additional spices to create a velvety and fragrant sauce. Once the koftas are cooked and the gravy is prepared, they’re lightly immersed inside the sauce, letting them soak up the wealthy flavors and meld harmoniously with the creamy texture.

Serving Suggestions:
Malai Kofta is high-quality loved with a whole lot of Indian breads which includes naan, roti, or paratha, which serve as the perfect accompaniment to absorb the splendid gravy. Alternatively, it may be paired with aromatic basmati rice or pulao for a satisfying and whole meal. Garnish with a sprinkle of sparkling cilantro leaves or a drizzle of cream for an brought touch of beauty and flavor.

Conclusion:
Malai Kofta embodies the essence of indulgence and culinary excellence, providing a symphony of flavors and textures that pride the senses and shipping you to the heart of India’s wealthy culinary background. Whether enjoyed at home with loved ones or savored at a satisfactory dining restaurant, this super dish guarantees to raise any eating revel in with its decadent allure and timeless appeal.

Here’s a traditional recipe for Malai Kofta:malai kofta

Ingredients:

For the Koftas:

2 medium-sized potatoes, boiled and mashed
1 cup paneer (Indian cottage cheese), grated
2 tablespoons cashews, finely chopped
2 tablespoons almonds, finely chopped
2 tablespoons raisins, chopped
1 teaspoon garam masala
1 teaspoon coriander powder
half teaspoon cumin powder
Salt to taste
Oil for deep frying
For the Gravy:

2 tablespoons oil or ghee (clarified butter)
1 onion, finely chopped
2 tomatoes, pureed
1-inch piece of ginger, grated
three-4 garlic cloves, minced
1 teaspoon cumin seeds
1/2 teaspoon turmeric powder
1 teaspoon pink chili powder (regulate to taste)
1 teaspoon garam masala
half cup heavy cream
1 tablespoon butter
Salt to taste
Fresh cilantro leaves for garnish

https://amzn.to/3UrWIZk
Instructions:

To make the koftas, in a huge mixing bowl, combine the mashed potatoes, grated paneer, chopped cashews, almonds, raisins, garam masala, coriander powder, cumin powder, and salt. Mix properly till the whole lot is calmly blended.

Divide the mixture into small portions and form them into round or oval-shaped balls. Ensure there aren’t any cracks in the kofta mixture. Set aside.

Heat oil in a deep frying pan over medium heat. Once the oil is hot, carefully upload the koftas in batches and fry until they flip golden brown and crispy on all sides. Remove from the oil and drain on paper towels to put off excess oil. Set aside.

https://amzn.to/3UFABhU

To prepare the gravy, warmness 2 tablespoons of oil or ghee in a separate pan over medium heat. Add the cumin seeds and allow them to splutter.

Add the chopped onions and sauté until they turn golden brown and translucent.

Add the grated ginger and minced garlic to the pan and sauté for another minute until the uncooked odor disappears.

Stir in the tomato puree, turmeric powder, purple chili powder, garam masala, and salt. Cook the gravy till the oil begins to split from the edges, and it thickens to a favored consistency.

Reduce the warmth to low and add the heavy cream and butter to the gravy. Stir well to combine and simmer for another 2-three mins.

Gently add the fried koftas to the gravy, making sure they are frivolously lined with the sauce. Allow them to simmer inside the gravy for a couple of minutes to soak up the flavors.

Once the koftas are heated through, do away with from warmness and transfer to a serving dish. Garnish with clean cilantro leaves.

Serve the Malai Kofta warm with naan, roti, or rice.

Enjoy your selfmade Malai Kofta, a delectable Indian dish it is sure to impress!

https://spicesaroma.com/kheema-10-super-tasty-and-quick-recipes/